This summer I am excited to be sharing a 'Monday Made it' each and every Monday. This little linky has kicked my bum into gear to get some crafty things done around here.
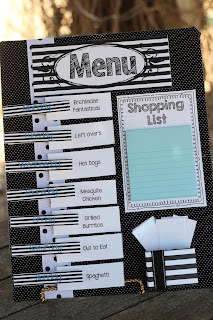
Today's Monday Made It is actually a little something for home rather than the classroom. However, this little Menu Board is going to make my life so much easier when school rolls around in August. You see, I am *terrible* at meal planning. I'm pretty busy teaching during the day and then trying to spend some quality time with my two little girls in the evenings. We eat out far too much, so this Menu Board is going to help me meal plan and grocery shop ahead of time so there is a plan. Kind of like lesson planning. =)
I found this idea here at
Rowdy in Room 300 and fell in love with it. My kitchen is done in a light blue, black and white Paris theme so I needed something to match. Rowdy in Room 300 has
a great tutorial and some printables here on her post that you can use for the board. I made my own menu header and days of the week to match my theme. If you'd like a black and white version,
here's what I used for my board. The shopping list is from
Rowdy's printables. I added magnets to the back so it hangs right on my fridge for easy viewing and use.
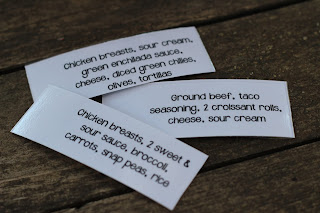
There is also a link to the formatted Word document used to create the meal cards. What's awesome about this is the ingredients for each meal are listed on the back of each card. So when I am making my shopping list I can flip over the card and write down what I need to shop for rather than having to find the recipe to create my grocery list. Brilliant!
All you need for this project is a 11x14 inch cork board, slightly larger fabric piece, 7 clothes pins, a tiny box to cover for the menu cards, a post-it pad or note pad for the shopping list, and optional ribbon and magnets. You also need to print out the menu header and create your own family menu list with ingredients.
I know that this little project is going to save me lots of stress and money!

 If you pop over to Rowdy in Room 300 she has an excellent tutorial on how to make these magnetic pizza pans that came from the dollar store. In order to make the yes/no boards you'll need two pizza pans, some wrapping paper, modge podge, and a spool of thick ribbon. I put my ribbon on differently than her tutorial. My hot glue was not sticking to the wrapping paper, so I glued it to the edge of the pizza pan. I opened up a spool of polka dot ribbon and cut it in half. It was the perfect length to make the boarder around the pan. I love my black and white theme!